SharpLine® Architectural Roof and Wall Cladding
Unleash your creativity and let texture take centre stage.


Base Material Thickness (mm): 0.55
Finish: COLORBOND®, ZINCALUME®, UniCote® Lux
Standard Steel Standard Steel Standard Steel Standard Steel Standard Steel Standard Steel Standard Steel Standard Steel Ultra Steel Matt Steel Matt Steel Matt Steel Matt Steel UniCote® LUX UniCote® LUX UniCote® LUX UniCote® LUX UniCote® LUX UniCote® LUX
COLORBOND® Basalt®
COLORBOND® Monument®
COLORBOND® Night Sky®
COLORBOND® Surfmist®
COLORBOND® Woodland Grey®
COLORBOND® steel Southerly®
COLORBOND® steel Dover White™
COLORBOND® steel Bluegum®
COLORBOND® Monument® Ultra
COLORBOND® Basalt® Matt
COLORBOND® Monument® Matt
COLORBOND® Shale Grey™ Matt
COLORBOND® Surfmist® Matt
Silver Quartz
Ashwood
Pentagon
Spectrum
Weathered Iron
Zinc Graphite
Certain colour options and finishes may be subject to availability and lead times may vary from site to site. Other colours may be available, subject to minimum order quantities and additional lead times. Please contact your local Stramit office to confirm.
Where to Buy
Stramit account holders can buy SharpLine® Architectural Cladding from their local Stramit office. We do not sell direct to the public but our products are stocked by retail outlets across Australia.
Availability
This product is produced in NSW, VIC and QLD. Availability and lead times may vary depending on your location.
News and Case Studies
Check out Stramit’s latest news, product releases and updates, and case studies featuring our quality Aussie-made steel products.
General Information
Adverse Conditions
Compatibility
Delivery and Unloading
Handling & Storage
Insulation
Lengths
National Construction Code Compliance
Registered Designs
Standard Conformance
Testing
SharpLine® roof and wall cladding will give excellent durability in almost all locations. It is however important to choose the correct coating for each application environment as shown in the table below. Durability recommendations do vary based on the application of the product, in roofing or walling installations.
The table below shows the suitability of coating types for different exposure conditions.

The suitability and exposure tables above are current at the time of publication and are guidelines only; conditions will vary from site to site. Please check the BlueScope Technical Bulletins at bluescopesteel.com.au for the latest information and guidance on selection, maintenance and durability of COLORBOND® steel and unicote.com.au for information on UniCote® Lux.
If uncertain about the appropriate coating for a particular application, or if the product is to be used in environments affected by industrial emissions, fossil fuel combustion, animal farming, or has unwashed areas, please contact your nearest Stramit office for advice.
All building products need to be checked for compatibility with adjacent materials. These checks need to be for both direct contact between materials, and where water runs from one material to another.
The following guidelines generally avoid material incompatibility:
- For zinc-aluminium alloy coated steel, colour coated steel and galvanised steel cladding avoid copper, lead, green or treated timber, stainless steel and mortar or concrete.
- Galvanised steel sheets should not receive drainage from aluminium or any inert materials, such as plastics, glass, glazed tiles, colour coated and zinc-aluminium alloy.
SharpLine® cladding requires additional care when transporting and unloading.
Pack mass may be up to one tonne. When lifting SharpLine® cladding, care must be taken to ensure that the load is spread to prevent damage.
Delivery can normally be made within 72 hours, subject to the delivery location, quantity and material availability, or can be at a pre-arranged date and time.
Please ensure that suitable arrangements have been made for truck unloading, as this is the responsibility of the receiver.
Stramit's roofing and walling products should be handled with care at all times to preserve the product capabilities and quality of the finish.
Packs should always be kept dry and stored above ground level while on site. If the products become wet, they should be separated, wiped and placed in the open to promote drying.
SharpLine® cladding is suitable for use with insulating blanket. Glasswool blanket up to 50mm thick can be readily used. Increased thicknesses require longer fasteners and greater care in installation. Ensure the length of the screw is sufficient to have a minimum of 3 threads protruding below the steel
support. For domestic applications the use of insulation aids with controlling energy efficiency.
SharpLine® cladding is supplied cut-to-length. When designing or transporting long products ensure that the length is within the limit of the local Transport Authority regulations. The manufacturing tolerance on the length of product supplied is +0, -15mm.
Stramit products conform to the following Australian standards that are called up in the NCC.
Steel material
- All metallic coated steel complies with AS 1397
- Painted steel product conforms with AS 2728
Roofing / Walling products
- Roofing/walling profiles conform with AS 1562.1, and AS 4040 parts 0, 1, 2 and 3.
- Corrugated roofing conforms with AS 1445
- Wind Load data conforms to AS 1170 part 2, and/or AS 4055
- Fasteners conform with AS 3566
- Installation details are in accordance with the Standards Australia Handbook HB39
Stramit's roofing and walling products are protected in Australia by registered designs.
All Stramit roofing and wall cladding products conform with, or are equivalent to, AS1562.1.
Stramit has in-house, purpose built testing equipment used to design, develop and improve products for the Australian market. Many of our products are tested or witnessed by independent organisations. These include:
- University of Technology, Sydney
- Cyclone Testing Station (James Cook University)
- The University of Sydney, and
- CSIRO.
The ongoing research and development activity ensure we remain at the forefront of innovation, design and consumer information.
Technical Information
Applications
Architectural Flashing
Architectural Specification
Cyclonic Areas
Fasteners For Non-Cyclonic Regions
Flammability and combustibility
Foot Traffic
Materials and Sheet Mass
Minimum Roof Slope
Oil Canning
Span Tables
Spring Curving
Thermal Expansion
Water Carrying Capacity
Wind Pressures – Non-Cyclonic Areas
Part of Stramit’s premier Architectural range, SharpLine® cladding can be installed horizontally, vertically or diagonally to suit the architectural requirements of the project.
Two fixing systems to enhance buildability and a variety of finishes make SharpLine® cladding an easy choice for architectural cladding.
Please refer to the Stramit Roof and Wall Flashing Architectural Detailing Design Guide.
This specification can be found on the Stramit website and can be easily downloaded onto your documentation.
The roofing/walling to be 0.55mm BMT Stramit SharpLine® cladding in continuous lengths with 25 or 38mm high ribs and flat trays spaced at specified centres to suit clip or direct fixing methods.
Sheeting material to be protected steel sheet to Australian Standard AS 1397, with a minimum yield stress of 300MPa (Grade G300) and an AM100/AZ150 coating with an ovenbaked paint film of selected colour, or a plain AM125/AZ150 coating.
The sheeting to be fixed to the purlins/girts in accordance with the manufacturer’s literature. Suitable fixing screws in accordance with Australian Standard AS 3566, suitable for minimum corrosivity category 3, must be used at every support.
Sheets to be laid in such a manner that the approved side lap faces away from the prevailing weather.
A minimum of 50mm to be provided for projection into eave gutters. Flashings to be supplied in compatible materials as specified; minimum cover of flashing to be 150mm.
All sheeting to be fixed in a workman-like manner, leaving the job clean and weathertight.
All debris (nuts, screws, cuttings, filings etc.) to be cleaned off daily.
Please contact Stramit's Technical Services team for information regarding cyclonic data for Sharpline® cladding.
All fasteners with Phillips head, conforming to AS 3566 - suitable for minimum corrosivity category 3.
Check fastener length if using insulation.

Fire resistance is such an important topic and one that we take seriously at Stramit.
Stramit roofing, cladding, rainwater and structural building products are manufactured from steel produced by BlueScope or Pacific Coil Coaters (through Selection Steel). Both organisations have had independent tests on their materials carried out by CSIRO or AWTA. The testing was conducted in accordance with the Australian Standard AS 1530.3 ‘Simultaneous Determination of Ignitability, Flame Propagation, Heat Release and Smoke Release.’ All materials had a surface finish less than 1mm in thickness and a Spread of Flame Index of 0. When tested in accordance with AS 5637.1:2015, BlueScope’s COLORBOND® steel has a Product Group Number classification of 1.
Stramit products made from these steel sources and with the tested finishes would be considered non-combustible according to NCC 2022 Volume One clause C2D10 (6)(e) and Volume Two clause H3D2 (1)(e). It is important to note that Stramit sheeting is only one component used in construction of these building elements, and other components must also meet the necessary requirements to satisfy the criteria.
For more information, refer to the Stramit Flammability Guide.
SharpLine® cladding roofs will be subjected to foot traffic and the spans in the table conform to AS 1562.1:2018 with 1.1kN load as specified in AS/NZS 1170.1:2002 for R2 - Other Roofs.
- Controlled – spans that conform to AS 1562.1:2018 but require minimal careful foot traffic only on the designated foot path. Suggested for use only where occasional aesthetic imperfections from foot traffic are acceptable.

Notes:
+ on plywood base. See note under wind pressure tables for details.
Tables are based on tests to AS 1562.1:2018 and AS 4040 parts 0 and 1.
++ Plywood base where roof pitch exceeds 10°.
Stramit’s SharpLine® cladding is manufactured from G300 colour coated steel, aluminium-zinc-magnesium or zinc-aluminium alloy coated steel. In some locations severe environment colour-coated steel may be available by arrangement.
Colour-coated steels are in accordance with AS/NZS 2728:2013 - Type 4 and, for the substrate, with AS 1397:2021. Aluminium-zinc-magnesium alloy coated AM100/AM125, zinc-aluminium alloy coated AZ150 conforms to AS 1397:2021. Stramit has a comprehensive range of colours as standard. Ask your nearest Stramit location for colour availability.

The minimum roof slope for Sharpline® cladding is 3 degrees (1 in 20). Please note: Roof pitches below 7.5° for SharpLine® direct fix cladding, and 5.0° for SharpLine® clip fix profiles require sealed side laps. All roof lengths above 5.0m also require sealed side laps.
Wide flat profiles may be subject to “oil canning”, a perceived waviness in the material. This may happen in any wide, flat profiles or with thinner gauges and is usually an aesthetic issue only, with the structural performance not being affected. There are a number of potential causes of oil canning. Since
many uncontrollable factors are involved, no coil manufacturer or roll former can realistically assure the total elimination of oil canning.
These causes include:
- the metal coil production.
- roll forming panel fabrication.
- the gauge and profile of the product.
- storage and handling of the product.
- the nature of the structure that the product is attached to.
- installation processes.
With careful attention to the production and selection of material, to the panel design and installation practice, oil canning can be effectively minimised.
To minimise the appearance of oil canning, use narrower profiles, lighter colours in matt finishes, ensure the sub structure is in a flat plane and fasteners are installed correctly.
Stramit tests to Australian Standard AS 1562.1:2018 and in accordance with the National Construction Code 2022 provides span load tables. The data in this manual is for non-cyclonic areas of Australia only. For use in cyclonic areas refer to the “Cyclonic Areas Roof and Wall Cladding Supplement” on the Stramit website.
The spans shown on the next page are based on the direct pressure testing method described in the current version of AS 1562.1:2018 and take account of foot traffic and wind resistance including local pressure zone effects.
Pressures are based on AS 4055:2021 or AS/NZS 1170.2:2021. Where the two standards differ, the worst case has been taken for each classification.
Data on next page applies to buildings with dimension limits given in AS 4055:2021, 7m or less in average height, 16m max width and length less than 5 times the width, where both length and width exceed the building height and site is unaffected by land topography. Maximum roof pitch 35°. Refer to AS 4055:2021 for more detail.
Designs for the most popular profiles are shown in table below.

Notes:
* Where roof pitch < 10 degrees, use spans given in red font for roof corners, or where roof pitch ≥ 10 degrees, use spans in red italics at the ridge/edge corners. Internal spans must have both end spans 20% shorter.
+ SharpLine® cladding to be fixed to minimum 15mm thick CD Grade plywood base at spans given in the table above. Maximum span of plywood 600mm
++ Where roof pitch is > 10° use plywood base as above.
Deflection under wind uplift not accounted for. If checking for this limit, please refer to serviceability pressures given in the wind pressure tables.
Values are only valid for use on steel supports 0.55mm G550 or thicker. Where thinner supports are used, fastener capacity must be checked. For 0.48mm thick battens, use #10x25 wafer head Type 17 screws (Direct fix) or #10x16 smooth/flat head self drilling screws (Clip fix) for fixing and reduce strength capacity above by 15%. All spans and pressures based on edge and corner areas of roof, and edge area of wall. In some instances, better spans may be possible away from edges in roof.
TC: Terrain category. FS, PS, NS: Full, partial and no shielding. Internal pressure coefficient +0.2/-0.3, external pressure coefficient -0.9(roof)/-0.65(wall). For more specific applications, SharpLine® cladding must be designed to the pressure and foot traffic limitations below.
Stramit’s SharpLine® cladding is not suitable for spring curving applications. It is most important that the structure behind the SharpLine® cladding is the one flat plane, so any installation distortions are reduced.
All metal roof sheeting is subject to thermal expansion and, where there is a temperature difference between the sheeting and the structure, this needs to be accommodated. The colour of the sheeting will affect the amount of thermal expansion, and whether the sheet is flat or curved will affect its ability to
resist without problems.
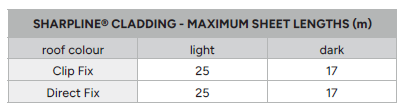
If longer lengths are required, sheet lengths must be limited to those shown below.
Stramit’s SharpLine® cladding has water-carrying capacity as detailed below. Roof slopes can be as low as 30 for many applications. Roof run lengths are the combined lengths of all roof elements contributing to a single pan drainage path. This can include the roof length upstream of a roof penetration that
concentrates flow into other pans.
All SharpLine® cladding profiles can be used at 30 slope for up to 30 metres run length and rainfall intensities up to 400mm/hr.
The table below gives slopes for 1% Annual Exceedance Probability (formerly 100 year ARI) rainfall intensity. For more information on water-carrying performance, refer to Stramit’s Roof Slope Design Guide.
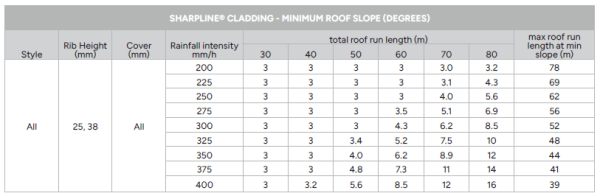
Notes:
Computations based on AS 1562.1:2018.
To avoid ponded water, minimum slope of 3° must be maintained along the entire roof length.
Stramit tests to Australian Standard AS 1562.1:2018 and in accordance with the National Construction Code 2022 provides span load tables.
The table below shows wind pressure capacity based on the direct pressure (airbox) test method.
Tables are based on testing to AS 1562.1:2018 and AS 4040 parts 0 and 2. Internal spans must have both end spans 20% shorter.

SharpLine Wind Pressures Non Cyclonic
Notes:
Values are only valid for use on steel supports 0.55mm G550 or thicker. Where thinner supports are used, fastener capacity must be checked.
For 0.48mm thick battens, use #10x25 wafer head Type 17 screws (Direct fix) or #10x16 smooth/flat head self drilling screws (Clip fix) for fixing and reduce strength capacity above by 15%.
Internal spans must have both end spans 20% shorter.
ł Where used on roofs, SharpLine® cladding direct fix 490, 465 and clip fixed 520, 485 to be fixed to minimum 15mm thick CD Grade plywood base at maximum 450mm spans.
+ For roof pitch >10° use a minimum 15mm thick CD Grade plywood base.
Design Information
SharpLine® cladding standard production maximum length is 9 metres. Longer lengths may be available however are not standard and must be discussed with Stramit before designing. Due to the nature of standing seam profiles, additional care must be taken when manufacturing, handling and transporting
long lengths. Ensure designs are made within the current standard lengths.
Installation Information
Stramit's cladding can be easily cut, where required, using a power saw with a cold cut saw blade or a power nibbler and, for localised cutting, tin snips. Avoid the use of abrasive discs as these can cause burred edges and coating damage. Please dispose of any off-cuts carefully and thoughtfully.
SharpLine® cladding is readily installed with or without insulation blanket.
The use of heavy-duty sarking is recommended to ensure weather tightness. If practical, lay sheets in the opposite direction to prevailing weather.
Installation of SharpLine® cladding is a straightforward procedure using the following fixing sequence for either SharpLine® Clip or SharpLine® Direct fix.
SharpLine® Clip Fix Cladding:

Refer to the section on Oil Canning for further tips on installation.
- Ensure all purlins/battens are in line and correctly installed and that plywood substrate, mesh and blanket (if specified)
are in place. - Use a string line, or the edge of the first sheet to align the first row of fixing clips. Attach the fixing clips to the structure using the correct fasteners, ensuring screws go in straight and head is not tilted or protruding.
- Position the first sheet over the clips ensuring the correct sheet overhangs (minimum eave overhang 50mm).
- Fasten through the vertical upstand to attach the sheet to the clip.
- Install fixing clips to each batten using two fasteners driven in straight, placing the clip over the trailing edge of the cladding sheet.
- Carefully lay the following sheet in place and press the interlock together along the sheet, ensuring the interlock is fully engaged. If needed, use a rubber mallet for assistance, taking care not to damage the rib.
- Continue to install fixing clips and subsequent sheets, checking that sheet ends at the lower edge are exactly aligned.
Note: Visible marking may result if excessive force is used. If the roof pitch is less than 7.5 degrees, or the roof run length exceeds 5 meters, apply silicone sealer below the underlap rib, prior to laying the following sheet. - Measure the overall cover width at the top and bottom of the sheets from time to time to avoid “fanning”.
- For roofs, turn up the pans at the upper roof edge and install flashings. Turn down the bottom end of the sheet to facilitate drainage into gutters.
- Clean up the roof after each day’s work, removing all screws, cuttings, swarf etc., and leave roof clean and watertight.
SharpLine® Direct Fix Cladding:

- Ensure all purlins/battens are in line and correctly installed and that plywood substrate, mesh and blanket (if specified) are in place.
- Either cut a full-length sheet of SharpLine® direct fix cladding near the trailing edge to create a starter strip or install SharpLine® cladding fixing clips to locate the first sheet (see steps 2, 3, and 4 for SharpLine® clip fix cladding installation).
- Position and fix the first sheet over the clips or partial sheet ensuring the correct sheet overhangs (minimum 50mm). Fix the edge down with nominated screws, through a slot in the sheet if available or through the sheet if not. Ensure the screws are not overtightened.
- Carefully lay the following sheet in place and press the interlock together along the sheet, ensuring the interlock is fully engaged. If needed, use a rubber mallet for assistance, taking care not to damage the rib.
Note: If the roof pitch is less than 7.5 degrees, or the roof run length exceeds 5 metres, apply silicone sealer below the underlap rib, prior to laying the following sheet, then fasten down with screws. - Continue to install and screw fix subsequent sheets, checking that sheet ends at the lower edge are exactly aligned.
- Measure the overall cover width at the top and bottom of the sheets from time to time to avoid “fanning”.
- For roofs, turn up the pans at the upper roof edge and install flashings. Turn down the bottom end of the sheet to facilitate drainage into gutters.
- Clean up the roof after each day’s work, removing all screws, cuttings, swarf etc., and leave roof clean and watertight.
Note that the different cover width versions of both SharpLine® clip fix cladding and SharpLine® direct fix cladding profiles can be used together
to create different architectural appearances, however SharpLine® clip fix cladding and SharpLine® direct fix cladding are not compatible and
cannot be used side by side.
As with all roofing products, extra caution must be taken when walking on the roof. When walking on SharpLine® roof cladding always wear flat rubber soled shoes and place feet only in the trays, taking care to avoid the last tray or two near edges of the metal roof area. Walk close to supports to avoid damage.
Below are some handy hints and tips to achieve maximum life from your COLORBOND® and ZINCALUME® finished products.
- In areas of little rainfall, products should be cleaned regularly.
- Brick cleaning acid should not come into contact with steel fascia, gutter, or roofing and walling.
- Never immerse these products in sand, soil or concrete.
- Do not use touch up spray can paint on COLORBOND® steel.
- Remove metal debris from cutting and/or drilling to avoid swarf damage.
- Prior to installation, keep bundled material dry.
- Prepainted metal roofing components should be stored in the shade as the protective plastic film will become difficult to remove if it is exposed to direct sunlight.
- Make sure materials made of different metal, such as copper and lead, do not make contact with these products, and water does not run from one to the other.
- Roofing and guttering should be free draining and free from dirt and leaves.